1/31/15

Passport Makeup: How To Take A Pretty Photo


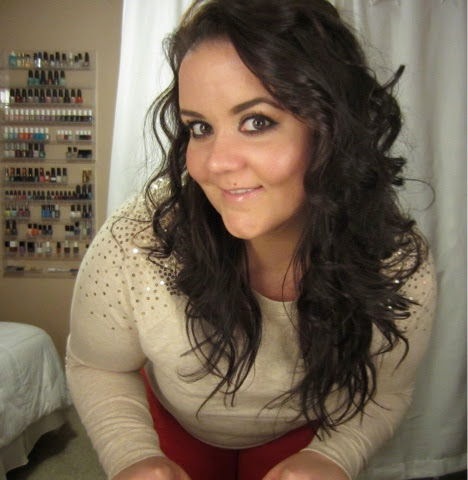
Hey guys!  If you enjoy traveling like myself, then you probably have a passport.  Unlike your driver's license and other types of identification, a passport is good for 10 years here in the States.  That's a very long time and you probably want the picture to look decent, right?  Today I thought I would share with you the makeup look I went with when I went to renew my passport.  If you follow me on Facebook then you probably seen I had some problems and wasn't able to get it done, but I am going back on Monday to renew it.  This will be the look I do (yet again).  


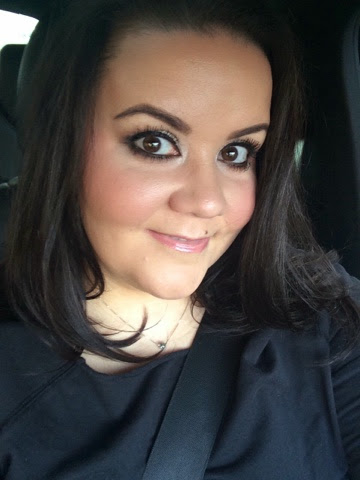
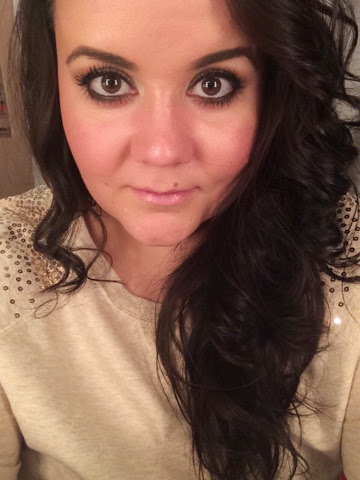
One thing to keep in mind, it was a VERY long day and these photos were taken about 12-13 hours after I applied my makeup.  ZERO photo editing here - no smoothing, NOTHING.  I wanted the pictures to be as realistic as I could get them, these are straight from my camera, so you can see all my flaws!  I had been lounging on the couch and stuff, so you'll notice my brows are in need of a little brushing (along with my hair) but oh well.  Hopefully you get the idea.  I applied my makeup around 8am and these pics were taken after 9pm.  The only makeup touching up I done was I lightly swept some powder on my t-zone and put on some lip gloss before taking the pics.  That's it.
(And yes, I'm wearing pajama pants in the photos, haha!)


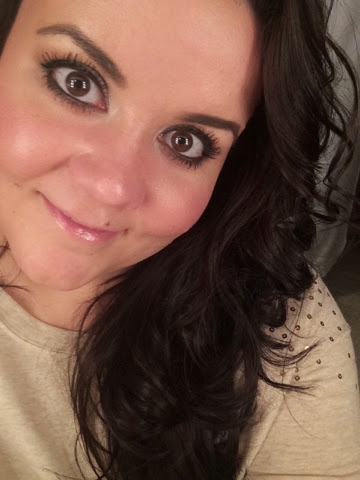
For my look I did my regular neutral smokey eye, keeping everything else on my face very natural.  The shirt I am wearing is from Walmart.  I wanted something neutral with not a whole lot going on, but I do like the bling detail on the shoulders.  When I went to have my photo made I was actually wearing a statement necklace, but I had took that off way earlier in the day.


On my face:
Make Up For Ever HD Foundation and Powder
Mac Prep + Prime in Radiant Rose
Mac Emphasize (to set my under eyes)
Maybelline Master Conceal (to cover any blemishes on my face)
Marc Jacobs O!Mega Bronze
theBalm Cabana Boy Blush
Hourglass Ambient Lighting Powder in Luminous Light
Anastasia Brow Wiz and Dip Brow Pomade
Urban Decay De-Slick Makeup Setting Spray


On my eyes:
Too Faced Shadow Insurance
Too Faced Semi-Sweet Chocolate Bar Palette
Makeup Geek Shimma Shimma Eyeshadow
Physician's Formula Eye Booster Eyeliner Pen in Black
Mac Costa Riche Eyeliner
Maybelline Lash Sensational Mascara


Since a passport is good for SO long, I wanted a makeup look that would be timeless - nothing trendy or tacky.  Just something very natural, where I still look like ME.  Neutral/natural colors are what I always wear.  I wanted my skin to not be shiny from oil, but to be luminious - kind of lit from within.  The lip combination I wore earlier that day was Nars Honolulu Honey lipstick and Buxom White Russian lip gloss.  Just very light and easy.


Alright guys, hopefully that gives you some ideas when getting ready for your passport photo!  My recommendation is to keep it simple, keep it natural, and to still look like you.  Wear something simple and neutral in color, and possibly throw on a statement necklace to give some life to the photo.  If you have any questions just leave 'em below!  Thanks for stopping by and have a great day!
post signature

1/29/15

NOTD: Wet n Wild On A Trip


A true "grape" purple, Wet n Wild's On A Trip is such a beautiful polish!  Complete opacity in 2 coats, this polish is super easy to apply.  


With the classic big/wide brush that most of the WNW polishes have, you can paint your nails really fast!


Out of all the purple polishes I have, this quite possibly might be my favorite.  Nice and bright, this purple hue really shows up without being too obnoxious.  I know Winter might not be when most people wear this shade, but I think this polish is beautiful anytime.


If you're looking for a gorgeous, cheap, easy to apply polish that would be flattering on just about anyone, definitely try On A Trip!  I don't think you'll regret it!
xoxoxo-
post signature

1/28/15

January 2015 Favorites!

Hey guys!  It is yet again time for monthly favorites!  I don't have too many this month, some beauty and some non-beauty.  So anyways, let's get to it.  We will start with hair stuff!


I've said it a 100 times at least, if it's something that goes down the drain (shampoo/conditioner) I tend to spend less on it.  If it's a treatment of some sort and it stays in my hair, I tend to invest a little more.  My favorite leave in products this month are the Chi Silk Infusion, the Aveda Smooth Infusion, and the Milk Shake Leave-In Conditioner.  I use all of these products on freshly washed damp hair, and they all help to smooth out my hair and make it softer to the touch.  Love them all!


And to further prove my point I just made, my affordable drugstore shampoos and conditioner!  For everyday I enjoy the L'Oreal Total Repair Extreme shampoo and conditioner.  But, if I am wanting to really get rid of product buildup I always reach for my Neutrogena Anti-Residue shampoo.  That stuff makes your hair feel SO clean.  Love.


I mentioned in a blog post earlier this month that I made Super Lotion, and people I love this stuff!  Look how much I've used!  I use it when I get out of the shower, all throughout the day as a hand lotion, on my feet at night, etc.  It's so moisturizing and emollient, I highly recommend everyone make some of this.  If you're not familiar with it, Super Lotion is a lotion you make using a handful of easy to find items at the drugstore.  This is not my concoction, we have the lovely Dana at The Skirt Girl to thank for that.  Check out her recipe here (it's super easy to follow and she is so clever and witty!)


I love serums for my face, eyes, hair, whatever.  They are usually jam-packed with great ingredients but don't make you greasy....kind of the best of both worlds for an oily skinned gal like myself.  This Tibetan Goji Berry eye serum that I got in my Winter 2014 FFFVIP box is lovely.  So moisturizing and cooling, it feels so nice on.


Beauty favorites this month include:
theBalm Frat Boy Blush
theBalm Cabana Boy Blush
Make Up For Ever HD Foundation
em Cosmetics Chiaroscuro Contour and Highlight Stick
Tarte Clean Slate Poreless Primer
Maybelline Lash Sensational Mascara
It Cosmetics CC Cream
Marc Jacobs O!Mega Bronze in Tantric


If you missed my blog post about using MOM as a makeup primer, then you might want to check it out.  I had heard of doing this for years, but am just now getting around to trying it.  Works great for controlling oil!!!

Here is a close up picture of some of the products:


Marc Jacobs bronzer


I have had this forever, yet I rarely used it!
Left side:  highlight cream
Right side:  contour cream


The trio is in the shade Nude Eyes.
Individual shadow names:  (1) Champagne  (2) Nude  (3) Mocha


Random skincare favorite, this oldie but goodie - the plain ole Olay Active Hydrating Beauty Fluid Lotion.  This stuff has been around for decades and continues to have a cult following.  Just a simple, no-frills face lotion that makes your skin feel really moisturized.  Simple as that.


A non-beauty favorite, this initial ring was from my mama.  She actually got us both one so we would match.  (How sweet is that?)  If you are interested in getting yourself one, you can find them here.


And lastly, my glitter iPhone case that I got earlier this month!  It's so pretty!  If you missed my post about it, you can check it out here.  It will depend on your computer settings if you can view it or not, but there is a small video clip showing the case and what it looks like.


Okay guys, that's pretty much everything that I have been really loving for the month of January.  Let me know what new things you've been trying (and loving or even hating)!  Thanks for stopping by and have a great day!
post signature

1/26/15

NOTD: Nails Inc. Floral Street


I love me a white manicure, and Nails Inc. Floral Street is my polish of choice for getting the look!


A beautiful creamy white, Floral Street is a little easier to apply than some stark whites that I have used in the past.  The lighter/whiter the polish the harder it is to apply, generally speaking.  And while you do have to have a steady hand to apply it, every little mistake doesn't seem to jump out at you with this.  Love!


Thanks for stopping by guys!
post signature

1/25/15

Drugstore Makeup Look!

Hey guys!  While I normally use a lot of high end items when I do my makeup, it is totally possible to create a lovely look with drugstore items as well!  Here is a look I created using almost ALL drugstore makeup (the only thing I used that wasn't was my Anastasia Brow Wiz).  Not all high end makeup is great, and the same is true for drugstore makeup as well.  But, through trial and error I have found products (both department and drugstore) that I adore.  If you're interested in seeing what I used to achieve this look, then just check it out below.


On this day I was mainly going to be staying at home, but my parents came over for the evening so I wanted to look somewhat put together.  Everything was super light and easy, perfect for a rainy night in.

On my face:
Milk of Magnesia as a primer
Covergirl Ready, Set Gorgeous foundation and powder
Milani Bronzer XL in Fake Tan
Wet n Wild Reserve Your Cabana
Covergirl Cheekers Blush in True Plum
Maybelline Dream Lumi in Radiant


On my eyes:
Physician's Formula Extreme Shimmer Cream Eyeshadow in Champagne
Sonia Kashuk Eye on Neutral 02 palette
Rimmel ScandalEYES Eyeliner in Brown
Maybelline Lash Sensational Mascara


To achieve the look I started out with the P.F. cream shadow on my lid, I blended out and deepened the crease slightly with a couple of shades in the Sonia Kashuk palette, and I used the first/lightest shade in the palette to highlight my browbone and tear duct.  I used a midtone shade to lightly detail the lower lash line and blend things out, and did a single coat of the Lash Sensational mascara.  I only lined my tightline and waterline, no liner on my lid.  To finish everything off I sprayed a light mist of NYX Matte Finish makeup setting spray.


Here's a closeup pic of some of these products in case you are interested in picking them up!


This is in shade:  Fake Tan
Excellent if you take a fluffy brush and sweep it all over your face to warm your complexion.  You can also dip a smaller more detailed brush into the darker matte shade to contour with.  Tons of product for very little $.


This is actually called a 'bronzer' but clearly it is too light to be a bronzer.  A GORGEOUS highlight powder to sweep on your cheekbones, down the bridge of your nose and in the center of the forehead.  It gives a soft, lit-from-within glow without any glitter or shimmers.  An excellent highlight for oily skinned girls like myself!


This eyeshadow palette is available only at Target.  It's a little expensive for a drugstore product, I think I paid around $20 for it.  But, this palette is totally worth it.  All of the shadows are matte and it is full of various midtone crease shades that blend out the crease perfectly.  VERY hard to find in drugstore products.


If you look where my thumb is you will see the shade name of this blush, True Plum.  Probably my favorite blush from the drugstore ever.


This is the lightest shade (Champagne) in the Physician's Formula Extreme Shimmer cream eyeshadow trio in Nude Eyes.  These are gorgeoussss!


And a closeup of the other products I used!

There truly are hidden gems at the drugstore, and some of my favorite products fall into that category.  If you haven't tried these products, then maybe this blog post will give you an idea of some things to try.  Thanks for stopping by!
#sundayfunday
post signature

1/24/15

Laxative On My Face??? Milk Of Magnesia As A Makeup Primer!

As an oily skinned gal I am always on the hunt for the best oil controlling products.  I first heard about using Milk of Magnesia as a makeup primer a few years ago, but for some reason I never tried it.


I know it sounds weird to put a laxative on your face, but several people that use it claim it works great for keeping oil at bay.  Tired of being a perpetual oil-slick, I decided to grab me a bottle of this and give it a whirl.  This is not for everybody, only those of us who struggle with really oily skin - who after a couple hours of wearing makeup already see the oil breaking through leaving us forced to blot/powder/touch-up the whole rest of the day.  I have only tried this twice now, but I have to say, it has worked rather nicely.  Here's how I do it.


From what I understand, you are ONLY supposed to use the ORIGINAL one - no flavors or special formulas, the basic original Milk of Magnesia.  Instead of having to keep this big gaudy bottle on my vanity, I decided to transfer a little bit into this clear plastic bottle that I have.  (This particular bottle came in a set of travel containers I purchased from Aveda years ago).  Make sure if you do this that you shake the product really well before transferring.  You'll also want to shake it each and every time you use it, as the product does separate as it sits.  I watched a few videos on YouTube to see how others used it, and most of them put a little in their hand and then rubbed it on their face.  I am not a fan of putting product on my hands, so I used an F60 foundation brush by Sigma to apply mine.  I just shook the bottle really good, put maybe a pea size drop of the MOM on my brush, and then simply applied it to my face in light stroking motions.  I used probably 2 drops for my whole face the first time I used it, which probably wasn't enough.  (I always try the minimum amount of something and then work my way up if it's not enough).  I let the product dry for a minute or two and then went ahead with my regular makeup application.
One thing you might notice when using this product is some white streaking on your face right after you apply it and it has dried.  Simply wipe the streaks away with your foundation brush or your fingers.  They will blend away very easily.

-Here I am the first day I used the MOM.  I had applied it along with my makeup around 7am and this photo was taken about 7 hours later in the car after a dental appointment.  I am slightly shiny, but overall not too bad.

The 2nd time I used this I applied closer to about 3 pea-sized drops and it seemed to work a little better.  I definitely notice a difference using this product, as I am no where near as oily.  It doesn't affect your foundation application, everything blends just as easy.  So the final verdict....this is a great product to use if you have oily skin!  Another plus?  It's super cheap and you get a ton of product so, win/win.  If you have any questions feel free to leave them below.  Hopefully this will help some of you out there who struggle with oil as I do!
post signature