4/29/15

Erin Condren Life Planner: Unboxing and How-To

Hey guys!  I recently posted this pic on FB and IG:


....so yeah....I totally caved in and jumped on the whole 'planner' bandwagon and I have to say, this is quite addictive!  I have totally been enjoying my planner, so I thought I would give you a more in-depth look at it in case you were interested in picking one up for yourself.  Today I am going to be talking about my Erin Condren Life Planner.


I will mention, since we are already into the month of April the planners are 40% off for 2015.  And that totally makes sense to me, 1/3 of the year is up so you get a major discount.


When you first open the box you get a ton of goodies!  Labels, gift tags, postcards, a lot of extras come with your planner.


The EC Life Planners have interchangeable covers that just pop off and on.  You can buy additional covers for around $10 on the site, which isn't bad at all I don't think.  I chose a light spearmint green with gold lettering.


(photographed really light)


I will give you a brief overview of the planner itself, what's in it, how it's laid out, that sort of thing.  One of the first things you'll see is the 2014/2015 year at a glance pages.


There is a 'monthly' view for each month....


...and then it is broken down even further, as you have a 'weekly' view as well for each week in the year.


There is a folder with pockets towards the back of the planner (pockets on front and back) and that is where you will find a Perpetual Calendar.  In this calendar you can put birthdays, anniversaries, any important dates and then you just transfer this calender to your new planner each year.  That keeps you from having to constantly write down everyone's birthday year after year.


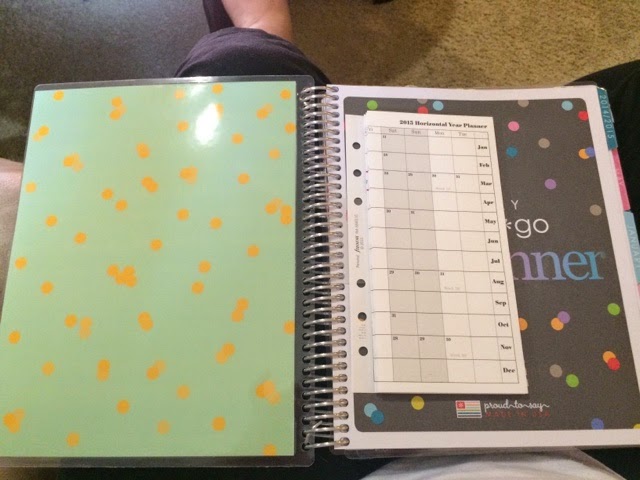
The planner has several pages of note paper in several different patterns:  lined, patterned, etc..


A fairly good amount of stickers come in the planner as well.


A 2016/2017 year at a glance calendar is in the 2015 planner.  This is where I keep my ruler (that also came in the planner).  I know that this is the page where my ruler is so I can flip open to this page anytime I need to.


Included also is this clear zipper pouch that can house any essentials you need.  I just put all my postcards/gift tags/extras that came with the planner in mine, as well as some coil clips that I ordered extra on the site.  I will show you those in a second.

~EXTRAS~


They had a special for a couple of days where you could get a free divider, so I was able to get this one for free.  Again it is in the spearmint green and my name and the design is in gold.  This is actually the same exact size as the cover, so if I wanted to I could totally use this on the front of my planner.  It is super useful as a divider though, I put it right before the "Notes" section of my planner which makes turning to that section super fast and easy.


This pen holder was only a couple of dollars and I thought at the time it would be super handy.  You just peel and stick it to the back cover of your planner and it holds an ink pen...


...but I have found it so much easier to just slide my pen down on the metal binder ring of the planner.  It keeps your page and is just so quick and easy.  If you have a pen with a rubber hand grip it is super aggravating trying to stuff it down the pen holder.  I would skip this if I had it to do over.  Again, it was only $2 so no big deal either way.


The Erin Condren coil clips are super handy for attaching anything you want to your planner.  Simply peel and stick.


I LOVE the Filofax Horizontal Year Planner, so I chose to affix mine to be the very first thing in my planner.  (Idea courtesy of livelaughplan!  Thank you!!!)


If you haven't ever seen the Filofax Horizontal Year Planners, it's basically this big accordion style year at a glance sheet of paper.  These are super cheap, about $5-$6 and they could be useful for so many people!  Automatically what comes to mind is a school teacher, or if you have a job that requires you to travel, whatever.  These calendars are just so handy.  I like to block out important dates on mine - travel, that sort of thing.


Something that has slowly became a huge necessity is stickers.  Stickers, stickers, stickers.  The more the merrier, stickers of any and everything!  I've become a crazy sticker lady!  I found some really great ones at the Dollar Tree.  Each pack was only $1!


I've also ordered several from Etsy...


...and from eBay.


I'm actually waiting on several more shipments of stickers as we speak.  I know, I told ya, crazy sticker lady.  As far as storing my stickers, I use this accordion style organizer that I am pretty sure I found at the dollar store a few years ago.  Works great, I just had to cut up some of my sticker sheets so that they would fit down in it.


Here is an up-close sample of what my planner is looking like:


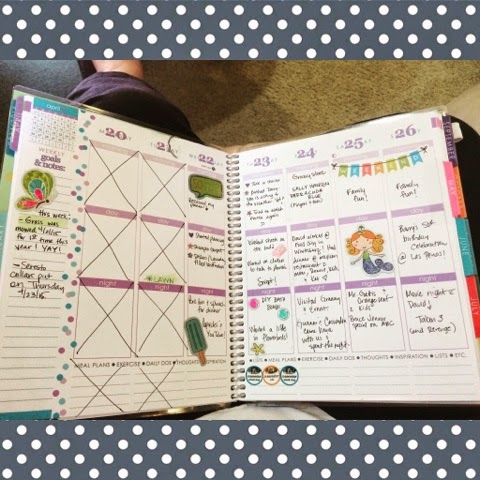
I treat my planner more like a journal - jotting what I done after the fact.  I will be keeping my planner and the whole point of doing this (for me) is so I can look back and see what I was up to.  On this page you can see the stickers I added.  Just in case you are interested I will tell you where they are from:
1.  Weekend banner - HelloAshleyann on Etsy
2.  Grocery bag - same
3.  Bed/sheets - same
4.  Mermaid - Dollar Tree
5.  Bath Bombs/balls - Dollar Tree
6.  Flower - Dollar Tree
7.  Round stickers at bottom - came with the flea collars I purchased my pets
8.  Stars and hearts - Dollar Tree
9.  Nail polish - AlexStudio on Etsy


Something else I am also doing is looking at the weather for the week and jotting down the temperature for each day.  Gives me a good idea of what to expect everyday and I don't have to keep checking the weather app on my phone.


Again, I use my divider for the "Notes" section of my planner.  I wanted to show you some charts I have made that are already super handy.  Some of these were also an idea from livelaughplan, so creative!


This first chart is kind of a "2015 To-Do List", but it's stuff you don't do all the time.  This is stuff that only has to be done quarterly or bi-annually, annually, etc.  I have plenty of room to add stuff as I think of it.


The "Giftlist" is great to jot down gift ideas.  I think this will be especially handy at Christmastime.


My "Wishlist" will be handy to jot down things I want as I run across them.  Or even just to scribble things worth looking into more.  I can honestly say there really isn't anything I am wanting or needing at this very moment.  Granted that can change at any moment or with one view of the wrong YouTube video, but at the moment I am quite content :-)


And then lastly something I want to keep up with is the books I read this year.  Can you tell that I enjoy memoirs the most?

Alrighty guys, that just about does it!  If you have any questions just let me know.  Also, if you know of a place to get cheap stickers let me know, lol.  They could easily run into a lot of $$$ and I am trying to do this as cheap as I can!  Thanks for stopping by and have a great day!
post signature

4/24/15

NOTD: Sally Hansen Barracuda ❤️

People, how have I owned this polish for 4 years and am just now using it???  It is GORGEOUSSSSS!


Barracuda is a beautiful pale blue creme polish that was (if I'm not mistaken) a part of a limited edition in 2011.  The Tracy Reese collection, maybe?  I've definitely seen this here and there over the years, so I don't know if it was re-released or what.  If you are interested keep an eye out, it definitely pops up from time to time.  I remember exactly where I got this, it was at a Walgreens in Orlando, Florida.  What I don't know is why it has sat on a shelf for so long without being touched! @#$%!

I think I used it a few times when I first got it, and then I just moved on to other things and forgot about it.  How on earth could that happen, this polish is gorgeous people.  Gorgeous.  No other way to put it.


I've mentioned this no less than 100 times before, but I ALWAYS use Seche Vite top coat on my manicures.  If I was out of this I would totally skip painting my nails until I had it.  Literally will not paint my nails unless I have this to finish with.  Also, a HUGE part of having pretty nails is keeping your cuticles in tip-top shape as well.  CND Solar Oil is excellent for this, and I always finish up a manicure with a swipe of this on each of my cuticles.


This color is bright yet soft all at the same time.  How is that even possible?  The first coat goes on a little streaky, but with the 2nd coat you've got complete opacity and what you're left with is uh-mazing.

Sally Hansen Complete Salon Manicure polishes are available at most drugstores (here in the US) and they are very reasonably priced depending on where you find them (roughly $5/bottle).  Let me know what colors you are rocking this Spring!  Thanks for stopping by and have a great day!
<3
post signature

4/20/15

My Go-To Makeup Look (For Months Now!!!)

Hey guys!  As someone who is constantly buying and trying new makeup, I think it says a lot when you fall so in love with products that they are the ONLY thing you want to wear.  Over the past several months I have been wearing the same exact things, and I can't hardly bring myself to wear anything different!  Today I wanted to share those items with you, and I am also posting a link to my smokey-eye tutorial on YouTube to show you exactly how I do my makeup every single time I wear it.

I am wearing the same exact makeup in these photos, the only thing that varied was my lipstick:


Short video clip of me wearing the makeup products:


Here is my eye makeup tutorial, I show EXACTLY how I do my eye makeup in case you haven't seen it.  You can either click the link below, or you can click HERE.

Here are the products, my latest addictions.


Covergirl Ready, Set Gorgeous Foundation
Urban Decay De-Slick Makeup Setting Spray
Maybelline The Rocket Mascara (I have NEVER worn falsies, this is all you need)
MAC Prep + Prime in Radiant Rose
Too Faced Shadow Insurance Eyeshadow Primer
Marc Jacobs O!Mega Bronze in Tantric
Anastasia Brow Wiz
Kat Von D Tattoo Liner in Trooper (upper lash line)
Urban Decay 24/7 Liner in Whiskey (matte brown for tightline and waterline)
Anastasia Dip Brow Pomade
Hourglass Ambient Lighting Powder in Luminous Light
Nars Blush in Taj Mahal


I am a bronzaholic, I can't believe I haven't hit pan in this.


I have the Ambient Lighting Powder Palette and another single as well, this is the ONLY highlight I've wanted to use since early 2014.  Can't. Get. Enough.  For the longest time I thought the Becca Shimmering Skin Perfectors were the best, I haven't reached for them in so long!


Hello my name is Erica and I am orange makeup obsessed.
This blush is ALL I want to wear this Spring and Summer!  SO GORGEOUS!


Ever since purchasing this palette, I don't think I have worn anything else.  Not even once.


This palette has everything I need when doing my eye makeup:  shimmering lid shades, light matte/satin browbone shades, matte midtone crease shades, deep/dark mattes to smoke things out, sparkly tear duct highlights, it has it all.  Neutral smokey eyes are my thing, this is the perfect thing to give me that.


My orange-ish lip products that stay in my bag - Guerlain Gipsy lipstick and YSL Rouge Volupte Gloss in #30.


When I first apply my makeup here at home I either swipe some Revlon HD Gloss in HD Citrine or some Maybelline Color Whisper in Orange Attitude on.  One step lip products that never fail.  LOVE.
If you are in the market for new makeup I wholeheartedly love all of these things and highly recommend them.  Products don't always perform the same on different people, and obviously people have different preferences and so forth.  But, if you like these types of products and these types of colors and shades then I'd recommend giving them a whirl.  Again, if you want to see how I apply my eye makeup in detail, check out my video HERE.
Thanks for watching and have a great day!
post signature